High Protein Peanut Butter Cups: A Dietitian-Approved Recipe for Guilt-Free Indulgence
Few combinations in the culinary world are as universally beloved as chocolate and peanut butter. That rich, creamy, slightly salty, sweet harmony has captured hearts (and taste buds) for generations. But what if you could enjoy this iconic treat without the guilt, knowing it aligns with your health and fitness goals? Enter the high protein peanut butter cup – a dietitian-approved creation designed to satisfy your cravings while delivering a beneficial protein punch.
For those looking to manage their macros, curb sugar cravings, or simply enjoy a more balanced sweet treat, learning to make protein peanut butter cups is a game-changer. Forget highly processed store-bought versions; this homemade alternative is not only incredibly easy to prepare but also offers a significantly more nutritious profile. It's the perfect solution for an afternoon pick-me-up, a post-workout reward, or a healthy dessert that won't derail your diet.
Why Make Your Own Dietitian-Approved Protein Peanut Butter Cups?
The decision to whip up your own protein-packed treats goes far beyond just saving a few dollars. It’s about taking control of your ingredients, optimizing your nutrition, and indulging smartly. As a dietitian, I advocate for balance, and these high protein peanut butter cups perfectly embody that philosophy.
The Unbeatable Chocolate & Peanut Butter Duo, Reimagined
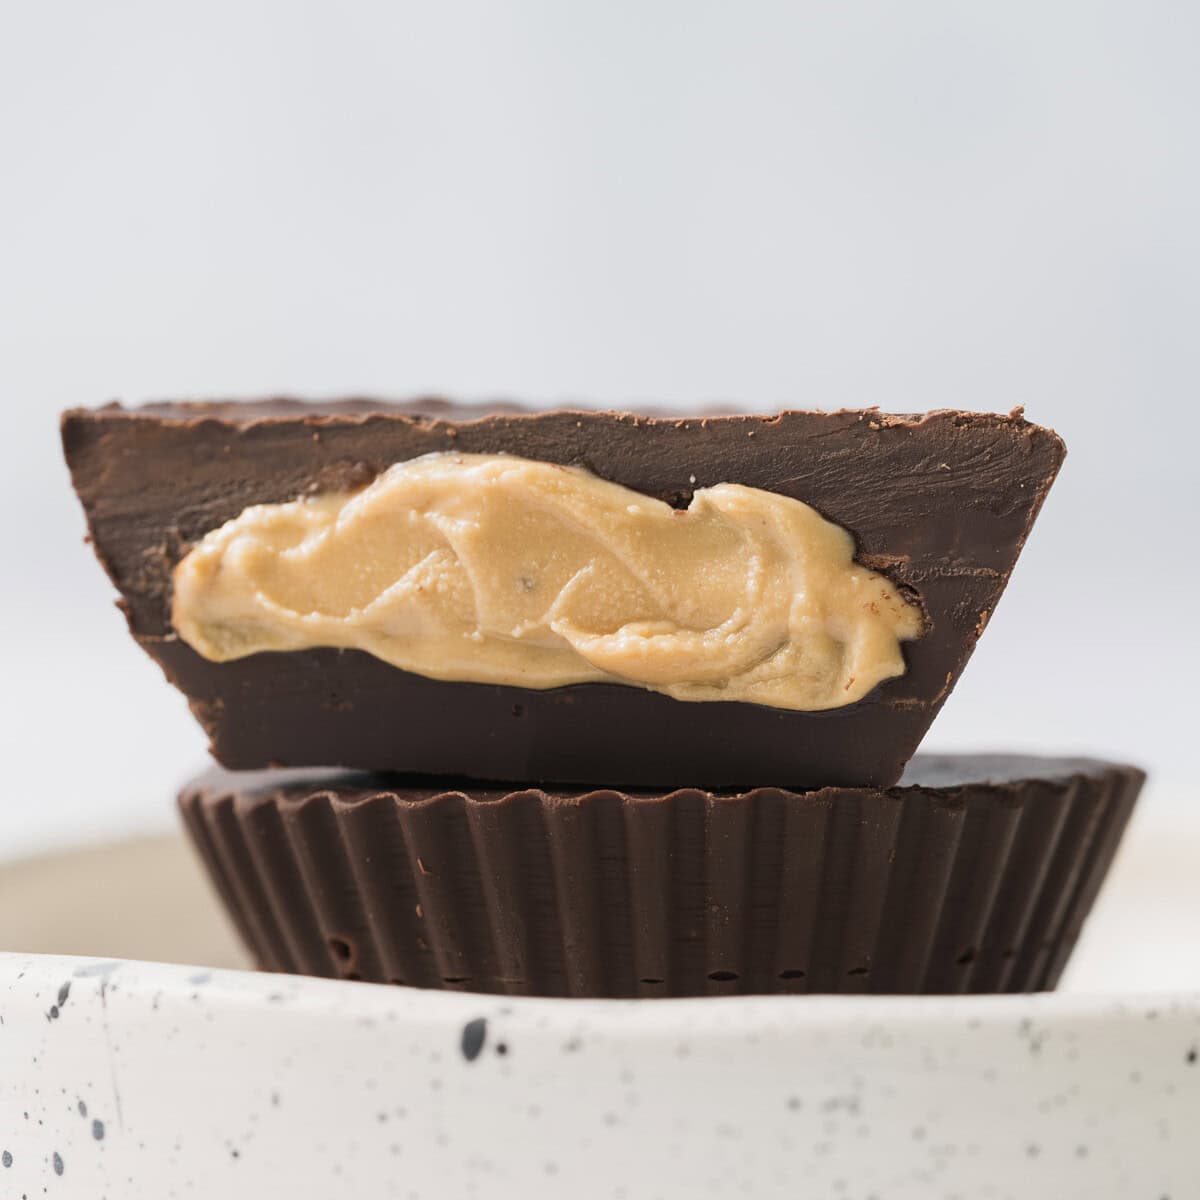
The allure of chocolate and peanut butter is undeniable. It’s a classic for a reason – the deep, slightly bitter notes of dark chocolate perfectly complement the nutty, creamy richness of peanut butter. By choosing to make protein peanut butter cups at home, you elevate this classic. You get to select high-quality dark chocolate (often with beneficial antioxidants) and natural peanut butter free from added sugars and hydrogenated oils. This already makes a huge difference compared to many commercial options.
A Balanced Approach to Sweet Cravings
One of the primary benefits of these treats, especially from a dietitian's perspective, is their enhanced nutritional balance. Traditional peanut butter cups are often laden with sugar and unhealthy fats, leading to quick energy spikes followed by crashes. By incorporating protein powder, you create a treat that offers sustained energy and increased satiety. Protein helps slow down the absorption of sugars, which can aid in blood sugar management and keep those nagging cravings at bay for longer. This makes them a smart choice when you're looking for a treat that feels indulgent but still supports your wellness journey. It's a testament to the idea that you don't have to completely cut out sweets; rather, you can transform them into something more beneficial.
Effortless Indulgence: No-Bake & Quick Prep
One of the most appealing aspects of this recipe is its sheer simplicity. These are truly Easy No-Bake Protein Peanut Butter Cups: Guilt-Free Treat! With just a few staple ingredients and minimal time, you can have a batch of delicious, healthy treats ready for chilling. There's no oven required, making them perfect for hot summer days or when you simply don't want to spend hours in the kitchen. The hands-on prep time is usually under 15-20 minutes, allowing you to quickly satisfy that craving or prepare a batch for the week ahead.
Your Go-To Freezer Stash
Batch cooking isn't just for savory meals; it applies beautifully to healthy desserts too. Once prepared, these protein peanut butter cups are incredibly Freezer-Friendly Dessert Idea. You can store an entire stash in your freezer, ready for whenever a sweet tooth strikes. This means no last-minute trips to the store for less healthy alternatives, and you always have a balanced, satisfying option on hand. They can be enjoyed straight from the freezer for a firmer, almost fudge-like texture, or allowed to thaw for a few minutes for a creamier experience.
Essential Ingredients for Your Protein Powerhouse PB Cups
To successfully make protein peanut butter cups that are both delicious and nutritious, selecting the right ingredients is key. Here's a breakdown of what you'll need and why each component matters:
The Foundation: Quality Peanut Butter
This is where the magic begins! Opt for a natural, creamy peanut butter with minimal ingredients – ideally just peanuts and maybe a touch of salt. Avoid brands with added sugars, hydrogenated oils, or excessive preservatives. The natural oils in good quality peanut butter contribute to the rich, creamy texture and distinct flavor of your cups. If you prefer a nuttier texture, a natural crunchy peanut butter can also work, adding an interesting textural contrast.
The Protein Punch: Choosing Your Powder
This is the star ingredient for boosting the nutritional value. The type of protein powder you choose can influence the final texture and flavor.
- Whey Protein: Great for a smooth texture, often mixes well.
- Casein Protein: Tends to be thicker and can add a lovely richness to the filling.
- Plant-Based Protein (Pea, Rice, Soy, Hemp): Excellent for vegan options. Be mindful of the flavor profile, as some plant proteins can have an earthy taste. Vanilla or unflavored options work best.
When selecting protein powder for baking or no-bake treats, look for one that has a good taste on its own and isn't overly gritty. If you don't have protein powder, collagen peptides can be a fantastic alternative, offering similar benefits for a delicious dessert, though it won't contribute to the same bulk in the filling.
Dark Chocolate Delights
For the chocolate layers, dark chocolate chips or a high-quality dark chocolate bar (70% cocoa or higher) are recommended. Dark chocolate is rich in antioxidants and contains less sugar than milk chocolate. You'll need to melt this gently, either in a microwave in short bursts or over a double boiler, to create a smooth, pourable consistency for your cup layers. Feel free to use semi-sweet chocolate chips if you prefer a less intense chocolate flavor, or even a sugar-free chocolate alternative for a lower-sugar option.
Sweetness & Flavor Enhancers
- Maple Syrup: A natural sweetener that adds moisture and a lovely, subtle flavor. You can adjust the amount to your taste. Honey can also be used, but maple syrup typically provides a more neutral sweetness that lets the chocolate and peanut butter shine. Sugar-free maple syrup is another excellent option for those monitoring sugar intake.
- Vanilla Extract: A non-negotiable! A hint of real vanilla extract elevates the overall flavor profile, adding depth and that classic creamy note found in the best peanut butter cups. Since this is a no-bake recipe, the quality of your vanilla extract will truly come through.
- Pinch of Salt: Don't underestimate the power of a tiny pinch of salt in balancing the sweetness and enhancing all the other flavors. It's the secret ingredient that makes everything taste more "finished."
Step-by-Step Guide to Make Protein Peanut Butter Cups
The process of creating these delectable treats is surprisingly straightforward, relying on simple layering and chilling. Here's a general overview of how you'll assemble your high protein peanut butter cups:
- Prepare Your Molds: Line a mini muffin tin with paper liners or use silicone muffin molds for easy removal. This is crucial for achieving that classic cup shape.
- Melt the Chocolate Base: Gently melt a portion of your chosen dark chocolate. Spoon a small amount into the bottom of each liner, swirling it up the sides slightly to create a base and edge. Chill these briefly in the freezer to set.
- Craft the Protein Peanut Butter Filling: In a bowl, combine your peanut butter, protein powder, maple syrup, vanilla extract, and a pinch of salt. Mix thoroughly until you achieve a thick, workable dough-like consistency. If it's too crumbly, add a tiny bit more maple syrup or a dash of plant milk; if too sticky, a little more protein powder.
- Form the Filling: Roll small balls of the peanut butter mixture and gently flatten them into discs that will fit inside your chilled chocolate bases. Place one disc into each cup.
- Top with Chocolate: Melt the remaining dark chocolate. Spoon it over the peanut butter filling, ensuring the entire top is covered. You can gently tap the muffin tin on the counter to help the chocolate settle evenly and release any air bubbles.
- Final Chill: Return the cups to the freezer for at least 20-30 minutes, or until completely firm. Once solid, they are ready to be enjoyed!
Customizing Your Protein Peanut Butter Cups: Swaps & Variations
One of the joys of making your own treats is the freedom to customize. While the core recipe to make protein peanut butter cups is fantastic as is, there are endless ways to adapt it to your preferences, dietary needs, or simply to add variety.
Nut Butter Alternatives
Not a fan of peanuts, or have an allergy? No problem! The beauty of this recipe is its flexibility. You can easily swap peanut butter for other creamy nut or seed butters:
- Almond Butter: Offers a slightly milder, sweeter flavor.
- Cashew Butter: Extremely creamy and rich, for a decadent feel.
- Sunflower Seed Butter (SunButter): An excellent choice for those with nut allergies, providing a similar texture and distinct flavor.
Chocolate Explorations & Toppings
While dark chocolate is recommended for its health benefits, you're not strictly limited.
- Experiment with different percentages of dark chocolate, or even use a good quality semi-sweet chocolate.
- For an extra layer of flavor and texture, sprinkle a tiny amount of flaked sea salt on top of the final chocolate layer before it sets. This sweet and salty contrast is incredibly satisfying.
- Consider adding a sprinkle of chopped nuts (peanuts, almonds, pecans) or even a pinch of shredded coconut for added texture and flavor.
- A tiny dash of peppermint extract mixed into the chocolate or peanut butter layer can create a refreshing mint-chocolate variation.
Boosters & Add-ins
Want to further enhance the nutritional profile or add unique flavors?
- Stir a teaspoon of chia seeds or flax seeds into the peanut butter filling for an omega-3 boost.
- A small amount of espresso powder can deepen the chocolate flavor beautifully.
- For a slightly tangy twist, a very small amount of lemon zest can be surprisingly delightful in the peanut butter layer.
Storage & Enjoyment Tips
Once you've mastered how to make protein peanut butter cups, proper storage ensures they stay fresh and delicious for as long as possible. We highly recommend storing your protein peanut butter cups in an airtight container in the freezer. This not only preserves their freshness but also maintains their firm, satisfying texture. They will last wonderfully for up to 3 months, making them a perfect meal prep item for healthy snacking.
When you're ready to enjoy one, you have a couple of options:
- Straight from the Freezer: For a firmer, almost candy bar-like experience, enjoy them directly from the freezer.
- Slight Thaw: If you prefer a softer, creamier peanut butter center, allow the cup to sit at room temperature for 5-10 minutes before eating.
Creating your own high protein peanut butter cups is a rewarding experience that combines the joy of indulgence with smart nutrition. By following this dietitian-approved approach, you can easily make protein peanut butter cups that are not only incredibly tasty but also support your health and wellness goals. So go ahead, whip up a batch, and discover your new favorite guilt-free treat!
